Chapter 1: On the Road to Extinction: Difference between revisions
No edit summary |
|||
| Line 26: | Line 26: | ||
Once you've gone as far left as you can, jump down. You'll land on a kind of landing with a large '''Spirit Skull'''. Collect this and drop down to the right(watch out for the fire when you land) Here, you will find a breakable wall on your left, hiding a ladder to the Sewers and an '''Ammo Kit'''. Break the wall, grab the Kit, and jump down the ladder. | Once you've gone as far left as you can, jump down. You'll land on a kind of landing with a large '''Spirit Skull'''. Collect this and drop down to the right(watch out for the fire when you land) Here, you will find a breakable wall on your left, hiding a ladder to the Sewers and an '''Ammo Kit'''. Break the wall, grab the Kit, and jump down the ladder. | ||
[[File:PhantomHead.png|20px|center]] | |||
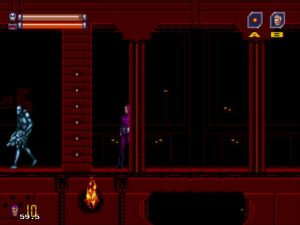
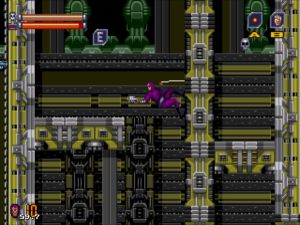
[[File:Uni_Space.jpg|thumb|''The Energy Extension found in the secret section of the Space Port.'']] [[File:Uni_prof.jpg|thumb|''The collapsed scientist whom you are looking for.'']] You will now be in the Sewers. Look at all that lovely green sludge dripping down the walls! This is only a short section, with a few Spiderbots to keep you on your toes. The easiest thing to do here is just run through, jumping any Spiderbots that might get in the way. Once you've reached the end, jump up toward the ladder. | [[File:Uni_Space.jpg|thumb|''The Energy Extension found in the secret section of the Space Port.'']] [[File:Uni_prof.jpg|thumb|''The collapsed scientist whom you are looking for.'']] You will now be in the Sewers. Look at all that lovely green sludge dripping down the walls! This is only a short section, with a few Spiderbots to keep you on your toes. The easiest thing to do here is just run through, jumping any Spiderbots that might get in the way. Once you've reached the end, jump up toward the ladder. | ||
| Line 32: | Line 34: | ||
Once you've got the Extension, head back to the University via the Sewers. | Once you've got the Extension, head back to the University via the Sewers. | ||
[[File:PhantomHead.png|20px|center]] | |||
Once back in the University, head all the way to the right, being sure to go up the few openings to collect health and ammo as you do so. Eventually, you will come to an elevator platform. Ride this a short way up and you'll see a scientist laying on the ground. Take out any BIOTs that are near him then walk over to his collapsed form. | |||
The scientist tells the Phantom that a BIOT cruiser headed over to the Warehouse district. He gives you a '''Keycard''' to gain you access. We have our next destination! | |||
==The Warehouse== | |||
After a brief cut scene you'll be returned to the Map screen. Select the Warehouse from the map to continue on with the story. | |||
{| class="wikitable" style="color: purple;width: 70%;" | |||
|[[File:Skull.png|30px|]]'''Optional:''' Once you've been returned to the Map screen a few more locations open up to you. While it's not really worth exploring too much yet, you can return to the University to pick up a few items. When you re-appear at the starting point from the beginning of the game, go all the way right (the door won’t close on you now) and up to find a '''1-Up''' and '''Health Kit'''. You can also return to the University interior if you wish, but most of it has been blocked off. | |||
|} | |||
We start outside the Warehouse proper. There will be some small security drones flying around that may shoot at you. Ignore them. Head to the top entry on your left to find the door with the icon of the '''Keycard''' the scientist gave you. The door will open automatically. Go through to enter the Warehouse (there is a large '''Spirit Skull''' toward the top of the opposite wall of you need it). | |||
===Warehouse Interior=== | |||
When you enter, use your '''Inductance Rope''' to climb upward along the rightmost wall, dodging enemies as you do so. Move left along the suspended platforms to find a ledge with a large computer on it. Jump onto this and smash the thin wall in front of you and continue left. Along the way you'll find a small alcove with an '''Energy Extension'''. You can smash the middle "block" of the alcove (notice how the grey bar on its bottom is complete whereas the others are kind of divided? This full bar indicates that these blocks can be destroyed,) and jump up to get it. Go down the drop just to the left of this alcove and go right. Here you'll find a breakable floor which will reveal a '''Health Kit''' and large '''Skull'''. Go back up through the hole you made and continue moving right and down. You'll end up near a huge pile of crates close to the entry point. From here, go left to reach a moving platform. Before taking it up, punch through the walls to its left to reveal another '''Health Kit'''. | |||
[[File:PhantomHead.png|20px|center]] | |||
After riding the platform up, go left to find a '''Walker'''. Now you have a bit of a choice; take the low road with the Walker, or the high by destroying '''Security Machine 1''' to open '''Shutter 1'''. The Walker will let you destroy BIOTs and breakable walls in one go and enemies won’t be able to hurt you, but there isn't really much down here. Going through '''Shutter 1''' will allow you some goodies (the Walker ''is'' fun through). | |||
If you want to play around with the Walker, go for it, but once you reach the point where you can't progress with it any more, head back to where you originally found it. Use the two suspended platforms to move up and left. (When you reach solid ground again you'll see another floor above you. This is just where the alcove you got the Energy Extension from before is, so there's no need to go up there.) | |||
Continue left and you'll come to '''Security Machine 1'''. Destroy the Machine and '''Shutter 1''' will open, revealing a '''Health Kit'''. Just before you go through the now open door, however, follow the wall up to find a suspended platform. The ceiling above this can be broken to reveal a '''Spirit Extension.''' Now head back down and through the door. | |||
{| class="wikitable" style="color: purple;width: 100%;" | |||
|[[File:Skull.png|30px|]]These Security Shutters will become a common theme throughout the game. Every Security Machine has a corresponding shutter and vice versa. Unlike in this case, the Shutter and Machines are not always next to each other. Indeed, some can be quite far apart, so keep your eyes peeled! | |||
|} | |||
{| class="wikitable" style="color: purple;width: 100%;" | |||
|[[File:Skull.png|30px|]]In some cases, the numbers displayed on Shutters and Machines can vary between the Sega and Nintendo releases. If you are playing the Nintendo version of the game and the Shutter/Machine number is different than stated in the guide, don’t worry too much. If you’ve followed the guide and the Shutter/ Machine you’ve found is in the same location as the one stated in the guide but the number is different, then simply look for the corresponding Shutter/Machine number to what you are seeing in the game. | |||
|} | |||
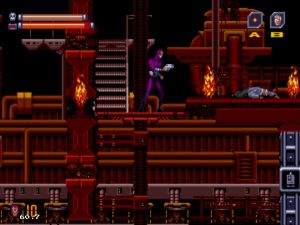
[[File:Wearhouse_walker.jpg|thumb|''The Walker.'']][[File:Wearhouse_door1.jpg|thumb|''Security Machine and Shutter 1.'']] | |||
Head up and to the left. You see a '''Full Spirit Skull''' behind a breakable ceiling. Grab it if you need to then continue left. You'll come to another moving platform so jump on and ride it down. The first floor you come to has a breakable wall and floor which present you with '''Health''' and '''Ammo Kits'''. Collect these and fall down through the hole in the floor you made. When you land jump onto the platform on your right and the up again to find more suspended platforms. Keep going up to find a '''Large Skull'''. Drop back down and continue right, drop down and then go left | |||
Now you'll find '''Shutter''' and '''Machine 2'''. Smash the Machine and go through the opened Shutter and head down. Ignore the '''Shutter''' and '''Machine 3''' as you can't get to it from here. To the left is a moving platform, and past that are breakable walls with a '''Full Health Skull''' and '''Full Ammo Clip''' behind them (you can see '''Graft''' hanging out waiting for you above). Now, take the moving platform all the way up and head left for a battle with '''Graft'''. . .your first of many to come. | |||
===Mid-Boss: Graft Mech Mk.1=== | |||
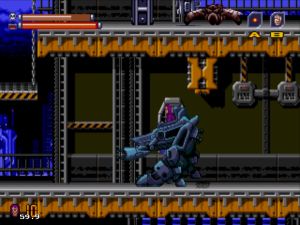
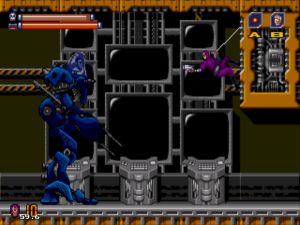
[[File:Wearhouse_graft.jpg|thumb|''Facing off against Graft. This shows the ideal position for fighting him.'']] | |||
After a brief cut scene, Graft will head off the screen and then return in a huge blue '''Mech'''. As this is the first boss fight in the game you should have no trouble with it. The weak points on the Mech are its arms, legs and, eventually, head. | |||
Firstly, position yourself suspended from the roof or wall in the top right corner of the screen (see image) with your '''Inductance Rope'''. This will line you up perfectly to blast at the Mech's arm and allow you to dodge the energy blast it fires at you by simply moving down the wall. At intervals, the Mech will also fire out '''Fire Grenades''', but don't worry too much about dodging them. Just keep blasting away at the arm and before too long it'll explode. | |||
With the arm gone, jump to the floor and stand under the wall you were just clinging to. Now blast away at his legs. You won't need to worry about the energy blasts here as they just go over your head, but it's easier to dodge the grenades now you're on the ground. | |||
Once the legs have gone, the Mech will be reduced to just the head section. It'll roll back and forth on the ground, shooting more grenades and trying to run you over. Just dodge it and its attacks and keep blasting at it. Eventually, the whole thing with explode and Graft will be left helpless on the floor. Walk over to him to begin another cut scene and finish this section of the Chapter. | |||
{| class="wikitable" style="color: purple;width: 100%;" | |||
|[[File:Skull.png|30px|]]'''IMPORTANT:''' After the battle with Graft you will have acquired the '''Breaker Bullet''' weapon. For some reason the game doesn't actually tell you this, you only learn about it the next time you go into your Inventory and find the icon is no longer greyed out. | |||
|} | |||
{| class="wikitable" style="color: purple;width: 100%;" | |||
|[[File:Skull.png|30px|]]'''OPTIONAL:''' After the cut scene is done and you find yourself outside the Warehouse again, you can actually re-enter it from either the lower or higher doors. If you do you find it destroyed (it did just blow up) and there are a few goodies such as '''Health''' and '''Ammo Kits''' laying around if you fancy some exploration. | |||
===Warehouse Exterior=== | |||
|} | |||
Revision as of 04:56, 30 April 2023
Kit Walker Jr., AKA The Phantom, is visiting his university professor, Professor Archer, to show him a strange African relic he found in the Ghost Jungle. However, Archer is acting weird and sends Kit way. As Kit leaves the University confused the building explodes! Kit quickly changes into his Phantom costume and our adventure begins!
Metropia University
Outside the University
Right at the start of the game you are presented with your first choice; investigate the exploded university to see if Archer or anyone else survived, or track down the ship of BIOTs you saw sneaking away.
Decision #1
We want to check up on Archer, but before heading left into the Uni there area few things that are worth collecting. From your starting point, the walls on the left and right both have an Ammo Kit and a Health Kit at their top, respectively. Use your Inductance Rope to get up there.
Once those are collected, you can head all the way to the left and into the University.
University Interior
Once inside the University you'll notice that some fires are still burning from the explosion and that BIOTs swarm the place. Start heading to the left and you'll come to a breakable wall. Smash this and go through. Just after the breakable wall is a gap with a platform moving up and down. Take it down to collect a large Spirit Skull and Ammo Pack.
Keeping to the high road, continue left collecting the various items you come across as you go. You'll know you are going the right way of you see a Health Kit within a small crater on the roof.
Once you've gone as far left as you can, jump down. You'll land on a kind of landing with a large Spirit Skull. Collect this and drop down to the right(watch out for the fire when you land) Here, you will find a breakable wall on your left, hiding a ladder to the Sewers and an Ammo Kit. Break the wall, grab the Kit, and jump down the ladder.
You will now be in the Sewers. Look at all that lovely green sludge dripping down the walls! This is only a short section, with a few Spiderbots to keep you on your toes. The easiest thing to do here is just run through, jumping any Spiderbots that might get in the way. Once you've reached the end, jump up toward the ladder.
You'll come up into a section of the Space Port that isn't accessible from the Port itself. Don't worry about the Security Machine, we can't get to it from here. The ceilings above you can be destroyed, first the right-most section, then the left-most of the next. Jump up through the gap to find an Energy Extension.
Once you've got the Extension, head back to the University via the Sewers.
Once back in the University, head all the way to the right, being sure to go up the few openings to collect health and ammo as you do so. Eventually, you will come to an elevator platform. Ride this a short way up and you'll see a scientist laying on the ground. Take out any BIOTs that are near him then walk over to his collapsed form.
The scientist tells the Phantom that a BIOT cruiser headed over to the Warehouse district. He gives you a Keycard to gain you access. We have our next destination!
The Warehouse
After a brief cut scene you'll be returned to the Map screen. Select the Warehouse from the map to continue on with the story.
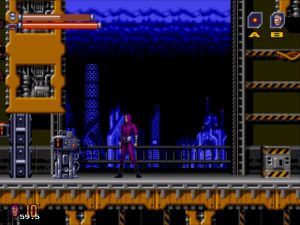
We start outside the Warehouse proper. There will be some small security drones flying around that may shoot at you. Ignore them. Head to the top entry on your left to find the door with the icon of the Keycard the scientist gave you. The door will open automatically. Go through to enter the Warehouse (there is a large Spirit Skull toward the top of the opposite wall of you need it).
Warehouse Interior
When you enter, use your Inductance Rope to climb upward along the rightmost wall, dodging enemies as you do so. Move left along the suspended platforms to find a ledge with a large computer on it. Jump onto this and smash the thin wall in front of you and continue left. Along the way you'll find a small alcove with an Energy Extension. You can smash the middle "block" of the alcove (notice how the grey bar on its bottom is complete whereas the others are kind of divided? This full bar indicates that these blocks can be destroyed,) and jump up to get it. Go down the drop just to the left of this alcove and go right. Here you'll find a breakable floor which will reveal a Health Kit and large Skull. Go back up through the hole you made and continue moving right and down. You'll end up near a huge pile of crates close to the entry point. From here, go left to reach a moving platform. Before taking it up, punch through the walls to its left to reveal another Health Kit.
After riding the platform up, go left to find a Walker. Now you have a bit of a choice; take the low road with the Walker, or the high by destroying Security Machine 1 to open Shutter 1. The Walker will let you destroy BIOTs and breakable walls in one go and enemies won’t be able to hurt you, but there isn't really much down here. Going through Shutter 1 will allow you some goodies (the Walker is fun through).
If you want to play around with the Walker, go for it, but once you reach the point where you can't progress with it any more, head back to where you originally found it. Use the two suspended platforms to move up and left. (When you reach solid ground again you'll see another floor above you. This is just where the alcove you got the Energy Extension from before is, so there's no need to go up there.)
Continue left and you'll come to Security Machine 1. Destroy the Machine and Shutter 1 will open, revealing a Health Kit. Just before you go through the now open door, however, follow the wall up to find a suspended platform. The ceiling above this can be broken to reveal a Spirit Extension. Now head back down and through the door.
Head up and to the left. You see a Full Spirit Skull behind a breakable ceiling. Grab it if you need to then continue left. You'll come to another moving platform so jump on and ride it down. The first floor you come to has a breakable wall and floor which present you with Health and Ammo Kits. Collect these and fall down through the hole in the floor you made. When you land jump onto the platform on your right and the up again to find more suspended platforms. Keep going up to find a Large Skull. Drop back down and continue right, drop down and then go left
Now you'll find Shutter and Machine 2. Smash the Machine and go through the opened Shutter and head down. Ignore the Shutter and Machine 3 as you can't get to it from here. To the left is a moving platform, and past that are breakable walls with a Full Health Skull and Full Ammo Clip behind them (you can see Graft hanging out waiting for you above). Now, take the moving platform all the way up and head left for a battle with Graft. . .your first of many to come.
Mid-Boss: Graft Mech Mk.1
After a brief cut scene, Graft will head off the screen and then return in a huge blue Mech. As this is the first boss fight in the game you should have no trouble with it. The weak points on the Mech are its arms, legs and, eventually, head.
Firstly, position yourself suspended from the roof or wall in the top right corner of the screen (see image) with your Inductance Rope. This will line you up perfectly to blast at the Mech's arm and allow you to dodge the energy blast it fires at you by simply moving down the wall. At intervals, the Mech will also fire out Fire Grenades, but don't worry too much about dodging them. Just keep blasting away at the arm and before too long it'll explode.
With the arm gone, jump to the floor and stand under the wall you were just clinging to. Now blast away at his legs. You won't need to worry about the energy blasts here as they just go over your head, but it's easier to dodge the grenades now you're on the ground.
Once the legs have gone, the Mech will be reduced to just the head section. It'll roll back and forth on the ground, shooting more grenades and trying to run you over. Just dodge it and its attacks and keep blasting at it. Eventually, the whole thing with explode and Graft will be left helpless on the floor. Walk over to him to begin another cut scene and finish this section of the Chapter.
